Please Note:This article assumes PayTek has been previously set up and is running along happily. Your pay clerk is missing and it is time to do today's pays. No problem, let's take things step by step.
Click on your PayTek shortcut and the main PayTek should appear.
This is the main PayTek screen showing the transactions menu where most of the action takes place. Take a moment to review this then we will begin to do our payrun for today.
This is the transactions menu. Treat it like a checklist when you are processing the payroll each week.
•Process Payroll – This is where you enter the information for each persons pay. (More of this below)
•Payroll Grid – This shows a grid to speed data entry. (It does not show all the details in the main data entry screen).
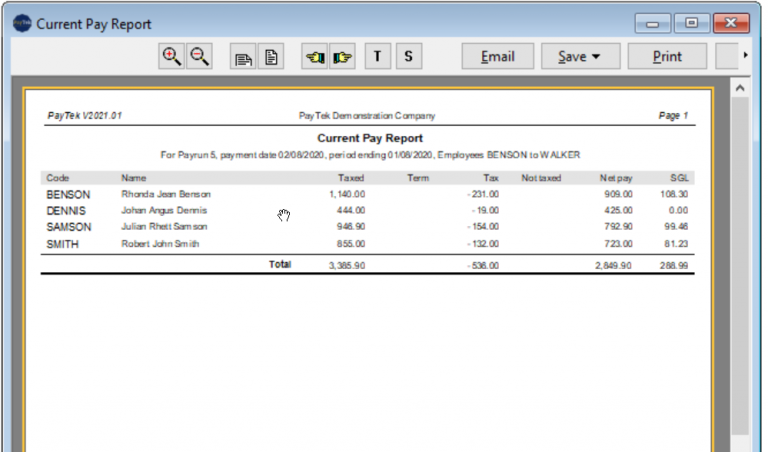
•Current Pay Report – After entering the information look at this report to make sure all the information is correct
•Print Payslips – You need a payslip for each person
•Coinage Report – If you unfortunately have to pay by cash, print this report to take to the bank to get the correct breakdown
•Cheque listing – If you do not print the cheques using PayTek use this report to help write your paycheques out.
•Bank Transfer Summary – This shows the details for employees paid by bank transfer (to one, two or three accounts)
•Create EFT file – This creates a standard ABA bank file that you can send to the bank or upload to their website for processing (the easy way to go)
•Backup Data Files – Skip this at your peril (just think how long it would take to re-enter all your payroll information for a year)
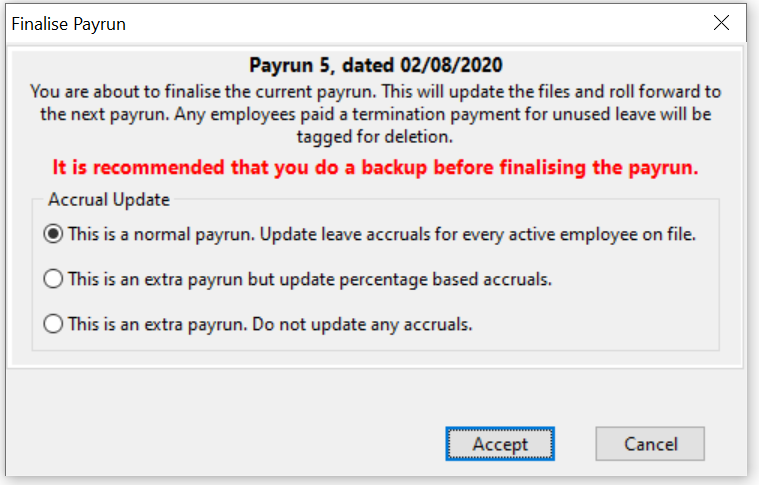
•Finalise Payrun – This updates the data files with the current payroll information and rolls the pay week forward by 7 days. Remember the current payrun does not appear in the reports until you finalise.
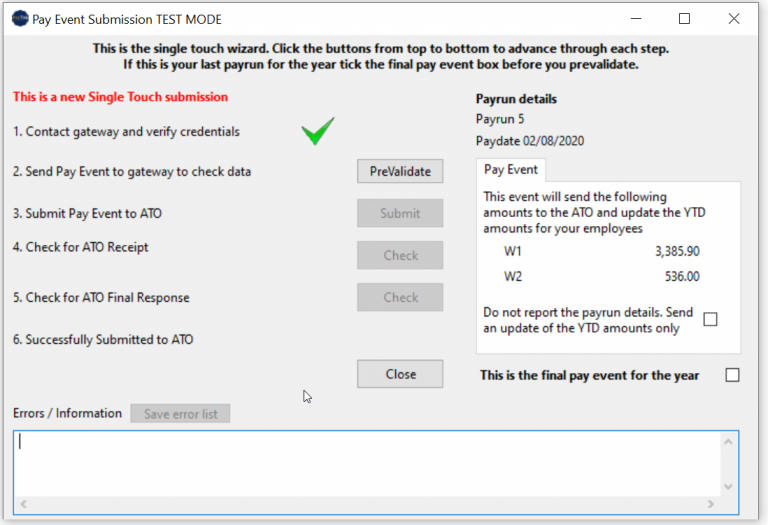
•Single Touch Payroll – After updating the database by finalising the payrun you must submit it to the ATO via single touch payroll.
First, let’s check where we are up to in the payroll.
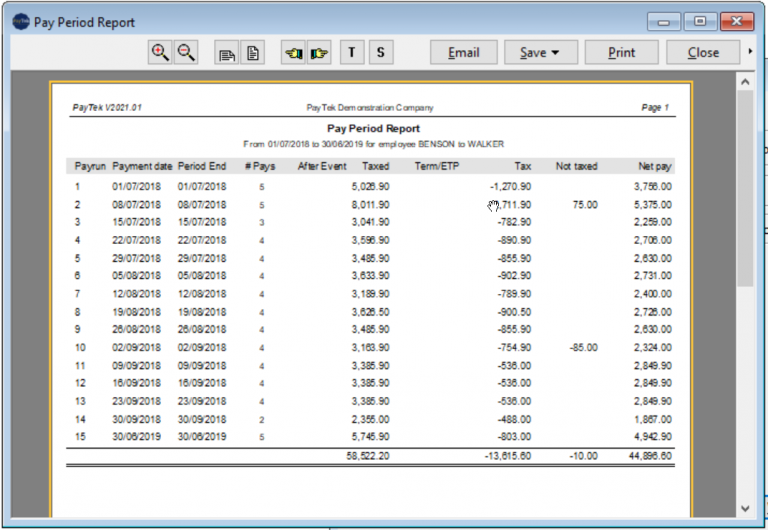
The first step is to find out where the payroll is up to. Click on the Reports button and preview the Pay Period Report as below.
Preview this report for the full financial year. This will show you every finalised payrun in the system. If last weeks payroll is not on the report it probably hasn’t been finalised. Run the current pay report (from the Transactions menu) and check the date and payrun number. Finalise last weeks payrun (from the Transactions menu) if necessary and you are ready for the next one. We’ll assume last week was a normal payrun so leave that as the default when you finalise it.
Now we are ready to do today’s pays.
Select Process Payrunfrom the Transactions menu.
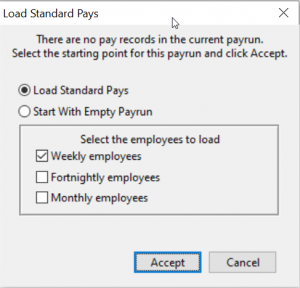
If the Load Standard Pays dialog screen appears (as on the right) it means that:
1. The current payrun is empty (which is what we would expect) and
2. You have standard employee pays entered (which is good as it saves you time and effort)
Click accept and the standard pays will be loaded for us.
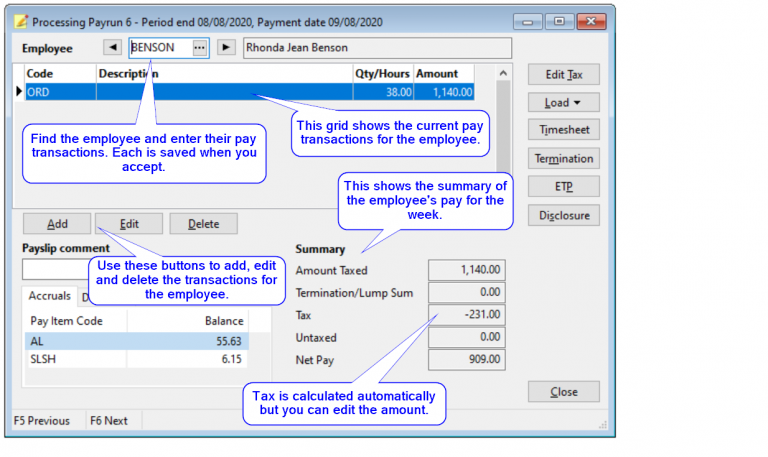
Time to enter the pay information for this week. Shouldn’t take too long. You may want to look at last week’s payrun (see below for the enquiry screen details) as a guide to what pay items are used to pay each person. Ordinary time or Wages should be the main one.
This shows the payrun number and the pay period end date.. This date is the end of the pay week that we are paying, not necessarily the day you are actually paying your staff (ie today).
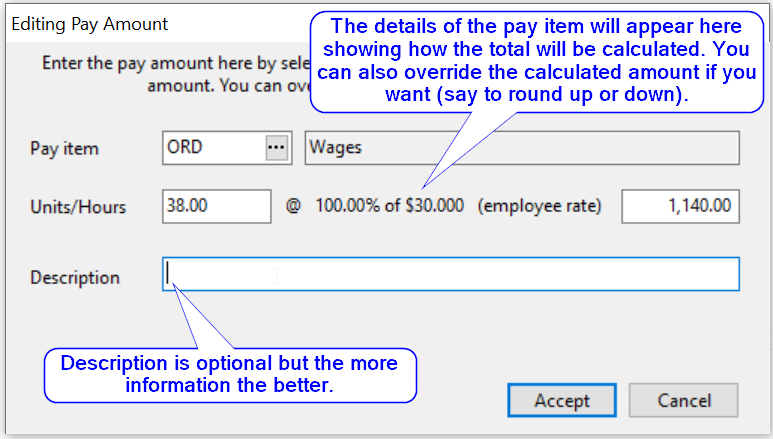
When you click the ‘add’ or ‘edit’ button, this window pops up to let you add an item to the employees pay.
Select the pay item you want to add to this persons pay. The default rate will appear and you can enter the hours. (If it is a fixed amount pay item, you just enter the amount.)
When you have happy with details, just click Accept and this new entry will appear in the persons pay and the summary at the bottom will be recalculated accordingly.
When you have entered the pay information for each person the hard work is over. We can check, print and pay the staff. Let’s move on.
Moving down our “checklist” (the transactions menu) we now print the current pay report to check that each person is being paid the correct amount.
Now that everything is correct we can press on by
•Printing the payslips •Printing the reports required for cash, cheques and bank transfers
•Creating the EFT file to send to the bank. (Make sure you note where this file is being created on your drive so you can find it with your bank’s software).
THE MOST IMPORTANT STEP IS TO DO A BACKUP SO YOU DON’T HAVE TO DO ALL THIS AGAIN IF YOUR PC CRASHES. MAKE A BACKUP TO FLOPPY OR USB DRIVE (NOT THE HARD DISK AS WE DON’T WANT ALL OUR EGGS IN ONE BASKET)
Next step is to finalise the payrun. A normal payrun will update the leave accruals for each employee. If you have linked PayTek to an accounting system you will see the details and be asked how you want to transfer the payments (Accept the defaults unless instructed otherwise)
The final step to processing the payrun is to report it to the ATO using the single touch wizard.
Finalising the pay run updates the database. Single touch always send the YTD totals for each employee to update the ATO system.
That’s it! The pays are done. You can now review the data by looking at the enquiry screen for each employee or the reports menu for summary or detailed information. After finalising the last payrun for each month you may need the following information.
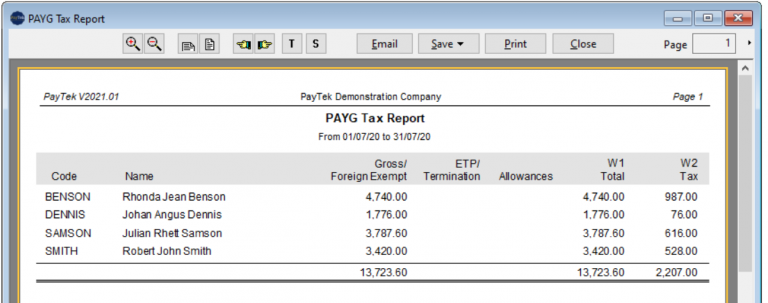
The PAYG Tax Report should be printed for the month and details the amount of PAYG to be remitted with your BAS. Single touch should prefill your PAYG and wages totals but cross-check with the PAYG report for the period in Paytek.
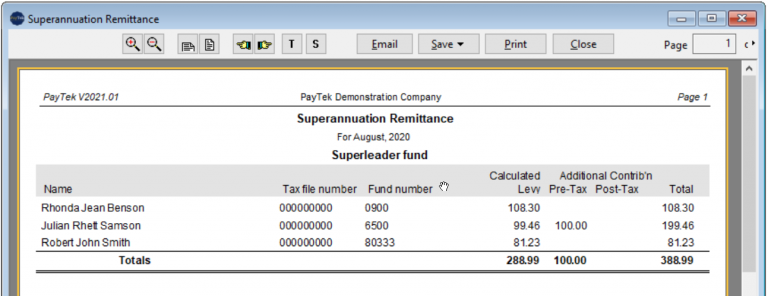
A remittance advice can be printed for each superannuation fund for the month or quarter to accompany your payment. If you use a clearing house that allows uploads you can create a contribution file for the period and upload it to your clearing house.
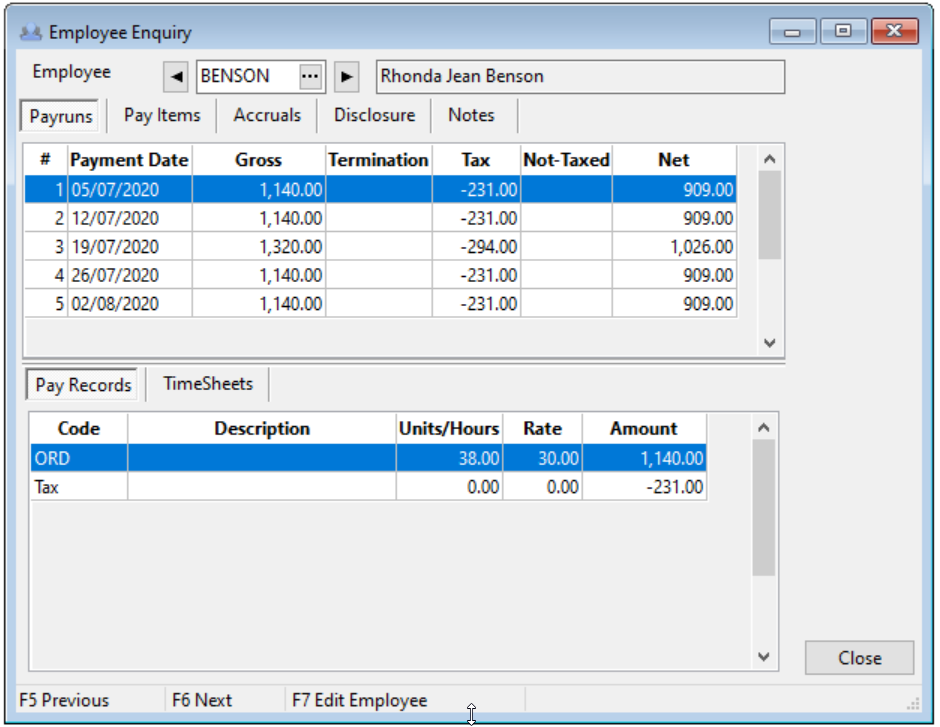
The employee enquiry screen is the best place to start if you need to know what a person has been paid or what leave they have owing to them. Just click the enquiry button on the main screen.
This screen shows the details on file for the selected employee for the year (not including the current payrun that is not finalised).
All the information at your fingertips!
The Pay periods tab shows each pay for the employee for the year and shows the details for the selected payrun below.
The Pay items tab shows the summary by pay item at the top and the details for each payrun below.
The Accruals tab shows the details of all leave accrued and taken for the employee.
The Notes tab shows any free form notes on file for the employee.
BUT WHAT IF I JUST FOUND A MAJOR MISTAKE IN THE PAYRUN I HAVE JUST FINALISED?
You have 3 options to fix it.
•Roll back the payrun to fix the mistake and re-finalise it. (This is the best option if you haven’t actually paid anyone yet)
Click Setup…Roll Back to Previous Payrun. NOTE: If you have sent the payrun to single touch this step will unfinalise the payrun so you can correct and send the new payrun to REPLACE the previous pay event sent to single touch.
•Correct the error in the next payrun (This may be ok if it is a small correction that can wait until next week)
•Process an extra “correcting” payrun to fix the problem. (This may be necessary if you have paid someone the wrong amount through the bank and they need it corrected now).
To process a correcting payrun, simply change the payrun date to the correct date (Setup…Change Current Paydate), enter the correction for the employee (Do not load the standard pays as we just want to adjust one person), running through the checklist as above and finalise the payrun. Then change the paydate to the next period end if necessary and all is fixed.