This section provides detailed instructions regarding the setting up of your payroll.
When you first load PayTek, the new company wizard will launch to create the data files for your payroll.

Step one is to nominate the source of your new data file. Setting up for the first time you would start with empty files but if you are transferring PayTek to a new computer you can restore from a backup disk or load from a transfer file.
Step two is to enter a code for your new file and to enter the company name. The company code is used to name the subfolder in your PayTek folder that will contain the data files. Use the first few letters of the company name or some other meaningful abbreviation.
Step three is to enter the last day of the financial year for your file. This will usually be the 30th of June. Every payrun in the file must be dated within the financial year.
Step four is to enter the date of the first pay period end. This date is the last day of the pay period and not necessarily the date you process the pays. Ie if you calculate your pays each week up to and including Sunday and process the pays on Monday your pay period end date is the Sunday.
Step five is to decide if you want to install a basic set of pay items into the new file. These suit most businesses and will save you some data entry time. You can modify them to suit later or tag them for deletion if you do not need them. Otherwise, start with an empty file of pay items and create only what you need (it is always good to keep things as simple as possible).
That’s it. PayTek will now create the data files for your company and automatically open the system setup window.
System Setup
From the setup menu select Options and enter your company details.
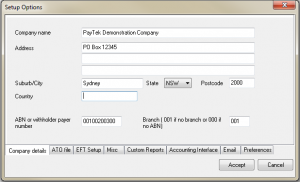
| Contact Details | These details appear on payslips and go into the ATO file of payment summary information |
| Company name | You can edit the company name here, but remember that this is how it will appear on the payment summaries and payslips. |
| Address | Enter the address details for your company. |
| ABN/Withholding Payer Number | Specify your company’s ABN or Withholding Payer Number. This number appears on the Payment Summaries and payslips. |
| Branch | Enter your BAS branch number if you have one. If you do not, simply enter 001. If you have a Withholding Payer Number instead of an ABN, enter 000. |
| ATO File | These details (except for payment summary signatory) go into the payment summary file |
| Email address | Company email address |
| Trading name | Usually the company name |
| Contact details | Name, phone and fax go into the ATO file. |
| Payment summary signatory | If you do NOT have to sign the payment summaries you should enter the signatory name here so it will print on the payment summaries. |
| EFT Transactions | PayTek uses these details to create a standard EFT transactions file (ABA format) if you pay employees via direct credit. |
| Company BSB and account | This is your company BSB and bank account. (If your bank account is less than 9 characters add leading zeroes.) |
| Company ID | Your bank will provide this code. If the bank does not require it enter all zeroes. |
| Include a debit record | Check with your bank about adding the debit record to the EFT file. |
| Company name for the EFT file | Your bank will provide this. It may be used as a security check by the bank so spelling is important. |
| Bank mnemonic | This is a 3-letter code for your bank that goes into the EFT file. (eg National Bank of Australia is NAB) |
Misc |
Some miscellaneous settings |
| Name for report footer | Enter your name. This will appear on all reports. |
| Default Pay frequency | This provides a default for each new employee, and is also used to calculate the new period end date after each pay run has been finalised. Pay periods can be weekly, fortnightly or monthly.
|
| Ordinary hours per pay week | This is used to calculate and display the equivalent days for leave accruals on the employee enquiry screen. |
| Payment usually made X days after period end | This provides a default payment date to appear on the payslips. It can be overridden when printing the payslips. |
| Payslip comment | Enter a comment to appear on the payslips |
| SGL report comment | Enter a comment to appear on the SGL employee reports each month or quarter |
| Employer ID for Super Clearinghouse | If you are using a clearinghouse to pay your superannuation to the employee funds you may need to include an employer ID in the file you send to them. The clearinghouse will advise you of the ID. |
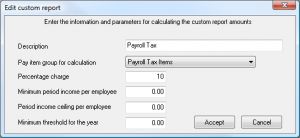
| Custom Reports | You can setup 5 different reports to assist in your reporting. One use could be to establish a report to calculate your payroll tax liability. |
| Description | This is the name of the report. When established this name will appear on the pay item screen so you can include or exclude each pay item from the report. |
| Pay Item Group | Select the pay item group that the calculations will be based on. |
| Percentage charge | This is the percentage charge to levy on the gross amount of the report. |
| Minimum threshold for the year | This value is the exemption threshold to be used in calculating the report total. An example of a report with a threshold is payroll tax, where the wages paid need to exceed a certain minimum amount before payroll tax is payable. Enter the annual amount, as PayTek will adjust for the reporting period. |
| Period income ceiling per employee | If you do not have to pay the levy above a certain amount per year, enter the equivalent ceiling per period here. (e.g. if the levy is not payable on any salary paid over $1000 per pay period, enter $1000 here.) |
| Minimum periodic income | This is the minimum periodic income for each employee before being subject to the levy (e.g. The superannuation guarantee levy is only payable when an employee’s monthly earnings exceeds $450). |
Example 1 — Payroll Tax Report
Assume that your company must pay 6% payroll tax on your gross payroll over $30,000 each month. Select an unused report from the list and click Edit •
- the name of the report — enter “Payroll Tax Report”;
- minimum threshold for the year — enter $600 000;
- minimum periodic income for each employee for the period — in this case, enter 0, as all gross income is subject to the levy; and
- percentage rate to be used in the report (6.0%)
When run, this report will calculate your liability for payroll tax each month.
| Accounting Interface | Use this screen to link PayTek to an accounting package. This will enable you to transfer the payroll information to your accounting system. |
| Accounting interface | Select the accounting package you are using. |
| Folder containing the accounting data files | Use the search button to select the folder containing accounting system data files to be updated by PayTek.
(To determine the CashManager folder, start CashManager and view the Configuration Status Report. The data directory is the folder you must specify and the program directory is the location of that folder.) |
| Name of Export file (JIWA or MYOB) | If interfacing to JIWA or MYOB you should specify a file name for the export file. |
| Bank account code for transactions (JIWA or MYOB) | If interfacing to JIWA or MYOB you should specify a GL account code for the bank account. |
| Use this screen to specify a mail server that PayTek will use if you want to email payslips from the program. | |
| Send emails via MAPI client | If selected, emails will be sent via your mail program and the messages will be in your sent folder. You may get warning messages as the emails are sent. |
| SMTP Mail server | This is the mail server for outgoing mail |
| User name | May not be necessary depending on your server (Leave it blank if your server does not require authentication) |
| Password | May not be necessary depending on your server. (Leave it blank if your server does not require authentication) |
| Your email address | This is important as any undeliverable emails will be returned to this address |
| Port number | This is the port number that the server uses, usually 25. |
Preferences |
PayTek options you can use |
| Print report borders and shading | If you have a slower printer you may suppress the report borders to speed printing. |
| Round net pay by adjusting tax amount | If you are paying employees with cash you can get PayTek to adjust the tax amount to make the net pay an even dollar amount. (WARNING This can cause odd cents to be deducted if the taxable amount is below the threshhold.) |
| Use Costing feature | The costing option provides you with a costing report for selected pay items. When you pay an employee you can also enter the chargeable hours and amount to compare with payments to the employee. |
| Enter timesheet hours only | This is a simpler option for data entry when entering timesheet information. |
| Show reminders on startup | This option allows PayTek to display the reminders screen if there are current reminders whenever you open the company file. |
| Bypass the backup question when closing PayTek | Please remember that a backup takes a few moments but could save you hours of work re-entering information. |
| Activate after-the-event processing | This feature is very useful for bureaus processing client payrolls at year-end. |
| Activate taxable payments annual reporting | This feature is very useful for clients who have to report subcontractor payments to the ATO. |
| Activate staff rostering | This feature allows you to use a simple rostering system for your staff. |
| Adjust PayTek screen size to Windows settings | This adjusts the PayTek screens for different display settings in Windows particularly if you set large fonts on high resolution screens. |
Set up Departments
You may wish to report information based on departments or cost centres. Create a file of departments then add each employee to their department. A number of PayTek reports allow you to subtotal by department.
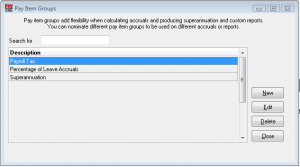
Create pay item groups
Create a file of pay item groups. We recommend you create at least 2 (rename the Default and use it first). You should have a pay item group for superannuation and one for calculating leave accruals.
Set up the pay item file
You are now ready to establish a set of “pay items” for your payroll. Give some thought to coding the pay items, as most of the reports allow a range of pay items to be specified.
Pay items are set up under the Setup menu. You will notice that you can access the PayTek “system” pay items for tax and termination payments etc. This enables you to include or exclude them from the superannuation and custom report calculations.
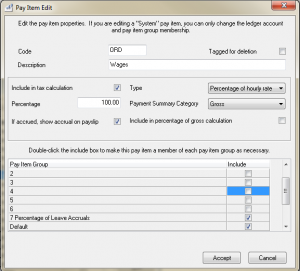
| Code | This is a 6 character code allocated to each pay item for easy reference. |
| Tagged for deletion | This allows you to tag a pay item for deletion at year-end. (You cannot use a tagged pay item when processing a payrun.) |
| Description | This is a description of the Pay Item, and normally appears on the employee payslips. |
| Ledger account | If you have linked your payroll file to an accounting package file you should nominate an account code for each pay item to be posted into. Depending on the accounting package you may be able to search the chart of accounts file for the account code. |
| Include in Costing Report | If you have activated the costing feature you can nominate which pay items are included in the report. If included, the pay item must be a “percentage of hourly rate” or “amount per hour type”. |
| Type:
Fixed amount, Amount per hour, Percentage of hourly rate or Percentage of Gross |
This setting determines how PayTek calculates the amount of the pay item for each employee.
Fixed amount means that only an amount (i.e. no hours) will be recorded for the pay item and no calculation will be made (e.g. a weekly car allowance of $80.00). Amount per hour means that you will be asked to enter the number of hours whenever this pay item is used. PayTek will then calculate the total amount by multiplying the hours you key in by the amount (e.g. a shift allowance of $2.00 per hour when working at night). |
| Percentage of hourly rate means that, like the previous type, you will be asked to enter the number of hours when using this pay item. But in this case, PayTek will use the hourly rate set up in the employee’s file, and apply this percentage to it (e.g. ordinary time would be paid at 100% of the employee’s hourly rate, time-and-half overtime would be set up as 150%).
Percentage of Gross allows you to create a pay item that is based on a percentage of the gross pay for the employee. The gross pay is calculated using the pay items nominated for inclusion. Note that calculated amounts can always be edited at the time of preparing an employee’s pay, if necessary. |
|
| Amount/Percentage | If the Pay Item is set up with an amount (rather than a percentage), that amount is entered here. If it relates to a deduction, it must be entered as a negative. This becomes the default amount for this pay item every time it is used.
If the pay item amount varies from employee to employee, it may be left blank here, and set up as part of each employee’s standard pay, with different amounts entered there. Note that in any event, the amount can be overridden when preparing an employee’s pay. If the Pay Item has been set up as a percentage of hourly rate or percentage of gross (rather than an amount), the percentage is entered here. It would be, for example, 100% for Ordinary Time, and 150% for time at time-and-a-half. |
| Include in tax calculation | This determines whether tax instalments are levied on this pay item during pay data entry.
It is possible to leave a pay item non-taxable at the time of payment, but taxable at year-end, by including the pay item in the Gross Amount column (see below) on the payment summary. An example is a leave loading not taxed when paid during the year, but required to be included in the gross earnings at year-end. |
| If accrued, show on payslip | If you accrue this pay item (for leave etc) you can show it on the employee payslips. |
| Include in percentage of gross calculation | If you are using any Percentage of Gross pay items you must nominate the pay items to use in the calculation. |
| Include in percentage of leave | If you calculate employee leave on a percentage of amount or hours paid you should nominate which pay items to include in the calculation. (normally only ordinary pay and not allowances etc) |
| Payment Summary Category | This determines where the pay item amount appears on the employee’s payment summary. It may be part of the Gross, Allowance, Union fee etc, Workplace Giving, Gross/Reportable Super, Foreign exempt or Not shown.
NOTE: If a person is not a normal employee – that is if they are subcontractors under a voluntary agreement for example – any amounts paid to them as will be included in their gross amount. |
| Pay item group membership | As you add or edit pay items you can specify whether they belong to any pay item groups you have in your file. |
The following is an example of a simple pay item list, illustrating the different attributes:-
Code Description Type Tax P/Summary
ORD1 Ordinary time 100% of hourly rate Taxed Gross
OT15 Overtime @ 1.5 150% of hourly rate Taxed Gross
OT20 Overtime @ 2.0 200% of hourly rate Taxed Gross
STAF Staff Salary Fixed Amount Taxed Gross
ANN Annual Leave 100% of hourly rate Taxed Gross
LL Leave Loading 17.5% of hourly rate Not Taxed Gross
SICK Sick Leave 100% of hourly rate Taxed Gross
CAR Car Allowance Fixed Amount Non Taxed Allowance
SALSAC Salary Sacrifice Super Fixed Amount Taxed Gross/Reportable
TELE Telephone Allow Fixed Amount Non Taxed Allowance
REIMB Reimbursements Fixed Amount Non Taxed Not Shown
SHIFT Shift Allowance $2.00 per hour Taxed Gross
When entering each pay item, be careful when specifying whether or not the pay item is taxable when paid, and where it appears on the payment summary. A good strategy it to keep the pay item list as short as possible. Add them as you need them.
Set up Superannuation funds
You are now ready to establish the superannuation funds that you contribute to on behalf of your employees.
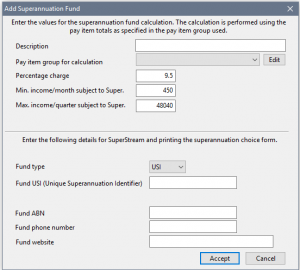
Superannuation funds are set up under the Setup menu.
| Description | This is the name of the fund. |
| Pay item group | Select the pay item group to be used for the calculations for this fund. |
| Percentage charge | This will normally be 9% for superannuation guarantee requirements but may be higher. |
| Min. income/ month subject to Super. | This is the monthly threshold that an employee must earn before you have to pay superannuation for them. |
| Max. income / quarter subject to Super. | If an employee earns over this amount per quarter you are not obligated to pay superannuation on the amount over this ceiling. Check with the ATO for the current maximum. |
| Superannuation fund details | These details are required for creating a SuperStream contributions file to upload to a clearing house. |
Add/edit employee data
The next step is to enter employee information. Select Edit employee data from the Setup menu.
The various items on the screen are self-explanatory, but the following notes may help:—
| Contact details | ||
| Code | This is a 10 character code for ease of reference to each employee. (Use the first letters of the employee’s name.) | |
| Surname | Enter the employee’s surname. It may be altered at any time. | |
| Given names | The given names are entered here, and may be altered at any time. | |
| Address 1, 2 | The address is entered in up to two lines. The suburb, state and postcode are entered separately, so don’t record them here. | |
| Suburb | This is the suburb, town or city field. | |
| State | Enter the state. | |
| Postcode | The postcode field. If the employee has an overseas address, you should enter 9999. | |
| Country | Country can be left blank if it is Australia. | |
| Date of birth | This is for reference but is required if you ever prepare an ETP payment summary for this employee. | |
| Date started | This date is required for leave accrual calculations, and appears on the employee’s payment summary in their first year of employment. | |
| Date permanent | This date can be used to record the date that the employee became a permanent employee. | |
| Date finished | This date is for reference only, and will appear on the employee’s payment summary. An employee can still be paid, even though a date is entered here. (To formally terminate the employee, either tag them for deletion or print their payment summary.) | |
| Tagged for deletion | If the employee has left, tag them for deletion. They will be erased during the end of year rollover and will not be visible when processing a payrun. | |
| Payment Summary Type | Specify what type of employee. This determines the format of the PAYG Payment Summary that will be printed for the employee. The default and most common type is Salaried Employee.
The other types are for people subject to withholding tax deductions. They are not officially employees, but rather contractors. These people are paid through PayTek with the employees, but are taxed at a fixed rate rather than the normal PAYG tax scales. All payments made to these types of employees are shown on their payment summary under the Gross Payments section. |
|
| Department | If you have set up departments you can select the department for the employee here. | |
| Classification | This is a reference field, and holds the employee’s award classification (if any). The classification appears on the employee’s payslip. | |
| The email address is used if you choose to email payslips to your employees | ||
| Phone | This information is for reference only. | |
| Award | Enter the name of the award the employee is employed under if applicable. This will appear on the payslip. | |
| Next of Kin | Use this field to record the employee’s next of kin and contact phone number for emergencies. | |
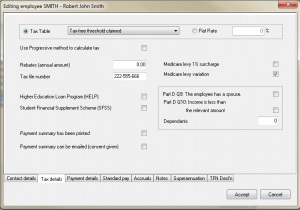
| Tax details | |
| Tax table/Flat rate | The tax table relevant to the employee must be entered here. The employee will provide a declaration form detailing the correct tax table to use.
Employees may, in special circumstances, be taxed at a flat rate. If so, you can select the flat rate and enter it for this employee. Alternatively, you can use the User-defined Tax Table. |
| Use progressive method | This option will apply a progressive taxing calculation for ad hoc payments. A typical example may be a real estate agent who is paid commissions. When a commission is paid PayTek calculates the tax withheld for the year and adjusts the tax on a pro-rata basis. |
| Deduct HELP repayment?
|
If the employee has a HELP liability you can specify that the tax deducted should include the appropriate HELP amount. The amount calculated is based on a tax table established in the Setup section. |
| Medicare Levy 1% surcharge | High income earners may elect to pay an extra 1% medicare levy if they are not privately insured. |
| Tax rebates (p.a.) | This is the total of the annual tax rebate claimed by the employee. It can be obtained from the Employee Declaration Form filled out by the employee. |
| Tax file number | This is the employee’s tax file number. Current Tax Office policy is that this must be provided within four (4) weeks of the employee’s commencement date. If this is not provided, the employee should then be taxed at a penalty rate. |
| Employees without tax file numbers:
If you are submitting your payment summary information to the Tax Office electronically, you must adopt the following practice for employees without tax file numbers (as specified by the Tax Commissioner):– |
|
|
• employees under 16 of age 333‑333‑333 |
|
| ABN | This is required for contractors subject to a withholding rate and will appear on the payment summary. |
| Withholding rate. | This is the rate to deduct tax for contractors not subject to the normal tax scales. |
| SFSS agreement
|
If the employee has a SFSS liability you can specify that the tax deducted should include the appropriate SFSS amount. The amount calculated is based on a tax table established in the Setup section. |
| Medicare levy variation | If the employee is claiming the Medicare Levy Variation, answer Yes to this question. You will then be prompted for more information, which is obtained from the declaration form completed by the employee, as follows:—
• Does the employee have a spouse? • Is their combined income less than the relevant amount? • Number of dependents. |
| Payment summary has been printed | If an employee leaves and takes their payment summary tick this box to prevent another being printed at year-end. |
| Payment summary can be emailed | This indicates if the employee has given consent for you to email their payment summary to them. This determines who is included in the bulk email of payment summaries that can be prepared. |
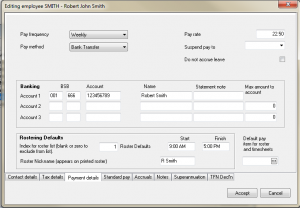
| Payment details | Details relating to how the employee is paid |
| Pay frequency | This field determines the way PayTek calculates the PAYG tax instalments. However, an employee can still be included in any payrun regardless of which pay cycle they belong to. Eg if the employee is weekly, then the weekly tax table will be applied to their pay each time the employee is paid. |
| Pay Method | This determines on which payrun disbursement report the employee appears. If the employee is paid via bank transfer, bank account details need to be entered for inclusion in the EFT file. |
| Pay rate | This is the employee’s hourly pay rate. During pay run data entry, this amount is used in calculating the total amount after entering the number of hours worked. (This is, of course, only applicable when using pay items that are based on percentage of rate rather than fixed amount.
If the employee is not paid on an hourly basis, this field can be left blank although you should enter an effective rate, as it will appear on the payslip. The accrued leave reports use this rate to calculate the accrual entitlements. If you intend to accrue leave for employees who are paid a fixed amount each payrun, enter an equivalent hourly rate for them for reporting. |
| Charge-out Rate | If you are using the costing report you can enter the charge-out rate for the employee here |
| Suspend pay to | If an employee takes unpaid leave you can suspend their pay. This will prevent their standard pay being loaded automatically. However, you can still pay the employee by entering pay details in the payrun. |
| Do not accrue leave | If an employee takes unpaid leave you can temporarily stop adding the leave entitlements to their accruals ledger. When they return to work, be sure to uncheck this option to allow them to accrue leave again. |
| Bank Account details
|
An employee’s net pay may be paid into one, two or three different bank accounts. Account 1 is the default. Enter the bank account name and number, including the BSB code. The statement note will appear on the receivers bank statement next to the paid amount.
If a second account is used, enter the details and the maximum amount to be transferred into that second account. For example, if you enter $200 as the maximum amount, the first $200 of the employee’s net pay each pay period will be credited to Bank Account 2. The remainder, if any, will be credited to Bank Account 1. If your employee wants to be paid to 3 accounts enter the details for the third account and a maximum amount for account 3. Note that the net pay is paid into account 3 up to the maximum. The remainder is then paid into account 2 up to its maximum with the balance if any going into account 1. |
| Rostering Defaults | This information helps you to manage your staff rostering. See Section 10 for details. |
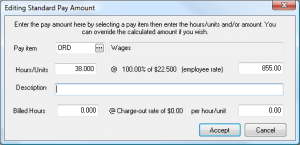
| Standard pay | Enter a standard pay for the employee that can be loaded into the payrun to save time |
| Enter the default pay transactions for the employee. The tax deduction will be calculated when the standard pay is loaded into the current payrun.
Enter either the hours or amount depending on how the pay item was set up. Deductions need to be entered as negative amounts. If the pay item is a percentage, then the calculated amount will appear, but it can be edited if necessary. You may also include disclosure amounts in the standard pay. If you are using the costing report you can enter default costing details as well. |

| Accruals | PayTek allows you to keep track of annual leave etc by setting up accrual pay items for each employee. |
| Pay item code | Enter the pay item that you wish to accrue for the employee. |
| Opening balance | This is the opening balance in hours (or amount if you are accruing leave based on a percentage of employees amount earnt) owing to the employee up to the date of the last finalised payrun. A new employee will have a zero opening balance. When you have established this accrual pay item an entry will be made each time a payrun is finalised. |
| Basis of calculation |
Allocate accrual hours per pay period PayTek will allocate fixed hours every pay run.
Allocate accrual hours based on percentage of hours worked PayTek will allocate hours based on the percentage of hours of nominated pay items
Allocate accrual amount based on percentage of amount earned. PayTek will allocate an accrual amount (dollars) based on the percentage of amount paid under the nominated pay items.
Allocate accrual hours on permanent date anniversary. PayTek will allocate the specified hours in the pay period containing the employees anniversary date .
Allocate accrual hours manually. This basis is useful if you are accruing time in lieu .Set up a pay item and bank any time in lieu hours by deducting them from the employee pay as negative hours. This will add the hours to the accrual. Then when the hours are paid the accrual will be reduced.
|
| Pay item group | This determines the pay items that are included in the calculation of the percentage accruals. |
| Description | Enter a descriptive note for the opening balance entry. This will appear on reports and can remind you of why/how/when the accrual was established. |
| Amount/Percentage to accrue each pay period | This is the amount in hours or percentage of hours/amount paid that will be added to the employee’s entitlements for each pay period. (Note when accruing set hours per period: Even if you nominate and pay an employee monthly, the amount per payrun will relate to the weekly payroll if that is the default pay period.)
Example Tip: Employees are often entitled to less sick leave in their first year of service. If this is the case, enter the reduced entitlement for the first year then increase it on their anniversary (a reminder will appear on the payrun screen for a month before their anniversary). |
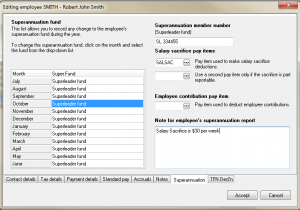
| Superannuation | This tab holds details for the employee’s superannuation guarantee contributions. Click on the grid super fund to add the employee to a super fund for each month. | |
| Superannuation member number | This number appears on the Superannuation Report. It can be used to record the employee’s membership number as set by the superannuation fund. | |
| Salary sacrifice pay items | Most salary sacrifice superannuation has to be disclosed on the payment summary. If only part of the sacrifice is reportable you can split the amount between 2 pay items (one being reportable and the other not reportable). | |
| Employee contribution pay item | If an employee contribution is deducted from the employee’s net pay you can specify the pay item here so the deductions will appear on the superannuation remittances. | |
| Note for employee superannuation report | Here you can enter text that will appear on the quarterly SGL report for employees, such at the actual date the payment was sent to the fund. | |
| Notes | On this screen you can keep notes about the employee. These will print on the Masterfile listing of employees and are also accessible from the employee enquiry screen. You can also enter a payslip note for this employee only. |
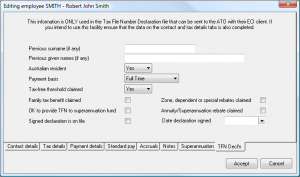
| TFN Decl’n | This tab holds employee details used to create the TFN Declaration file that can be sent to the ATO electronically. The information can be taken from the employee declaration they provide you when there begin employment. |
Enter payroll data to date
The final setting up step is to enter the payroll data from the start of the financial year up to the current pay run from your existing payroll records.
If you have installed PayTek part way through a financial year you will need to either: —
- Enter and process each pay period from the start of the year. The benefit of this method is that all of the reports and historical data for each employee for the whole of the year will be available in PayTek. It is also easier to reconcile the totals against your old pay records on a pay-by-pay basis to ensure no errors have occurred, and is a good way to become familiar with PayTek.
or
- Key in the year-to-date amounts for each employee and process these totals as the first pay run. (Make sure that the pay period end date for this catch-up pay run is the last period end processed with your old payroll.) This involves less data entry, and ensures that all year-to-date totals for each employee are correct. This is critical for printing payment summaries at year-end.